David Becker - Office of Collaborative Academic Programs
How do I make my class accessible?
Heading Styles
When we create documents or webpages, like our syllabus or assignment prompts, we are used to creating various sections of a document by bolding the text. This is fine for those who access the document visually, but for those who require a screen reader to navigate documents and websites, heading styles provide the same means of navigating a document as bold lettering provides for others.
For Microsoft Office Documents, you can find the heading styles in the top ribbon under “Home.”
In Canvas, you can find heading styles in the bottom, right-hand section of the Rich Content Editor toolbar.
Hyperlinks
In our personal lives, we may be used to sending friends and family links to various websites we think are interesting or entertaining by sending the URL, or this: http://www.usf.edu/student-affairs/student-disabilities-services/resources/canvas-accessibility-tips.aspx. While this may work for us in the moment, we wouldn’t enjoy using the web if every single link we used to navigate was presented to us in this manner. In fact, most links we encounter are formatted as text, such as “Sign in” or “Learn how to do this here!” Not only does this create a more visually appealing webpage, it creates a more accessible one, too. Rather than hearing a string of letters and symbols, a student using a screen reader will have a clearer idea of the link’s content. Using this method, our URL provided above would appear as Canvas Accessibility Tips. Much better, right? Learn how to create accessible links in your Canvas site.
Creating Hyperlinks to Websites:
- Copy (CTRL+C or right-click -> Copy) the URL you want to use for your hyperlink.
- Highlight the text you want to use as the hyperlink.
- Create the hyperlink.
- If you are using Microsoft Office, right-click on the highlighted text and then click on Hyperlink. In the following pop-up window, paste the URL into the Address field. Then click OK.
- If you are using Canvas, click on the Link to URL button in the Rich Content Editor. Paste the URL into the text box provided, and then click Insert Link.
Creating Hyperlinks to Course Components (e.g. Files, Pages, etc.) in Canvas:
- Highlight the text you want to use as the hyperlink.
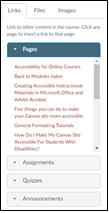
- Locate the page, file, etc. in the Content Selector on the right-hand side of the page, shown in the image to the right.
- Click on the content in the Content Selector to create the hyperlink.

Images
Adding images to our Canvas site can create richer learning environments for our students, as long as all students have access to the same experience. We do this by adding "alt-text", or alternative text, to the image. This alt-text describes the content of the image so those students who access the site via a screen reader understand the content of the image. If the image is too complex or communicates a process, add simple alt-text and include a more descriptive transcript below the image.
Adding Alt-Text to Images in Canvas:
- Click on Edit for the Canvas Page, Assignment, Announcement, etc. to open the Rich Content Editor.
- Click on the image embedded in your Canvas Page.
- Click on the Embed Image button in the Rich Content Editor.
- In the following pop-up window, add your descriptive alt-text to the Alt-Text text box, shown in the image on the right.

Adding Alt-Text to Images in Microsoft Office:
- Click on the image embedded in your document.
- Right-click on the image; then click on Format Picture.
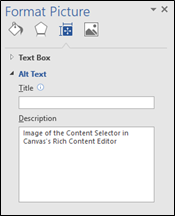
- In the panel that appears on the right, click on the Layout & Properties icon (second icon from the right).
- Then enter the alt-text for the image in the Description box and save the document.

Videos
Adding videos is a great way to provide another means of communicating course content to students, no matter the course modality. At the same time, we want to ensure all students have the same access to videos, just as we want every student to have equitable access to other visual information in the course. Captions help all students clearly understand the content. A student may need to use the computer in a computer lab, the library, or their lodge, and may not have headphones.
Using the video creation and hosting tool, Kaltura, we can create accessible videos for all students. Kaltura creates automatic captions for any video you create. While this form of captioning is not always 100% accurate, the captions are easy to edit. To learn more about how to use Kaltura, visit your Center for Teaching and Learning. To edit captions for your Kaltura video, follow the steps below:
- Log into Kaltura.
- Click your name at the top right, and select My Media.
- Click on the title of the video for which you wish to edit captions.
- Click on Actions just below your video, and select Caption + Enrich.
- The resulting table will display one row for each of the recording's caption tracks. Click on the pencil icon in the right-most column to edit the desired captions.
- In the resulting window, click the caption you wish to edit.
- Make edits to the caption in the text field in the center of the page.
- Click the Save button, just above the preview of your video.
- When you are finished making edits, click Save button once more.

